
diff options
| author | Kitzunu <24550914+Kitzunu@users.noreply.github.com> | 2021-06-12 14:50:58 +0200 |
|---|---|---|
| committer | GitHub <noreply@github.com> | 2021-06-12 14:50:58 +0200 |
| commit | f309cf79bbb032a0686b7d04feb8fec18e600a84 (patch) | |
| tree | 9ea7db08f0698ec9af213941307c83246c7b68a3 /docs/How-to-create-a-PR.md | |
| parent | b2610fad21012673061f5af786b022c96625cc26 (diff) | |
| download | wiki-f309cf79bbb032a0686b7d04feb8fec18e600a84.tar.gz wiki-f309cf79bbb032a0686b7d04feb8fec18e600a84.tar.bz2 wiki-f309cf79bbb032a0686b7d04feb8fec18e600a84.zip | |
chore: file naming standard (#517)
* A
* file naming standard
Fixes #491
* Revert "A"
This reverts commit 1c225fed753554098069597a2bbcbe08213b76a1.
* rename
* Revert "rename"
This reverts commit 65fd916faf8530ce258cc2b475c93971468680fe.
* Revert "file naming standard"
This reverts commit 6ca5a703a9e9d59f9c773029e4c04bfd012b6abb.
* bye
* Hi
* Create the-staging-branch.md
* 1
* Delete how-to-create-a-PR.md
* Create how-to-create-a-pr.md
* werafgt
* Update the-modular-structure.md
* wef
Diffstat (limited to 'docs/How-to-create-a-PR.md')
| -rw-r--r-- | docs/How-to-create-a-PR.md | 228 |
1 files changed, 0 insertions, 228 deletions
diff --git a/docs/How-to-create-a-PR.md b/docs/How-to-create-a-PR.md deleted file mode 100644 index a35d623..0000000 --- a/docs/How-to-create-a-PR.md +++ /dev/null @@ -1,228 +0,0 @@ -# How to create a PR - -### 1. Create a fork of AzerothCore - -You need to be signed on [github.com](https://github.com/). If you don't have an account yet, create one. - -Open the [AzerothCore repository](https://github.com/azerothcore/azerothcore-wotlk) -and create a fork of it by clicking in the top-right "Fork" button: - -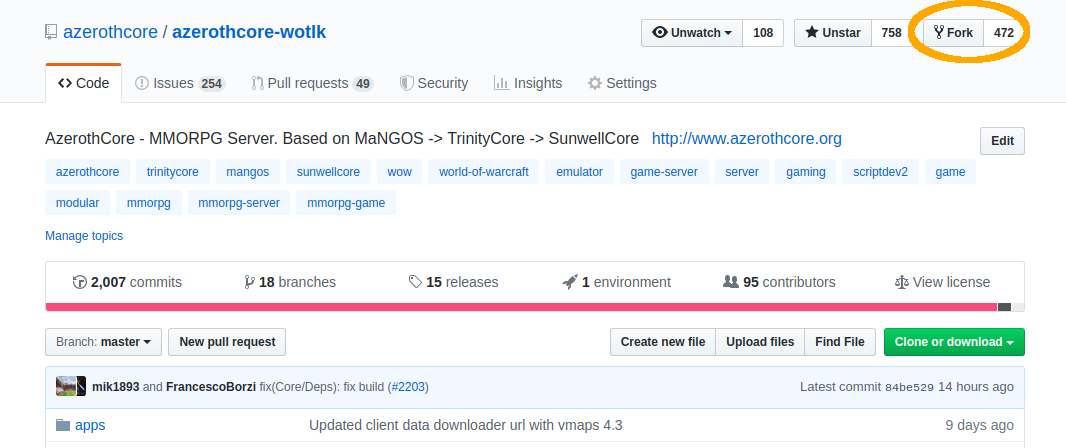 - - -### 2. Clone your fork to your local machine - -Once your fork is ready, you will see a screen showing **YourUsername/azerothcore-wotlk**. - -Click on the "Clone or download" button (on the right) and copy the https address of your fork: - -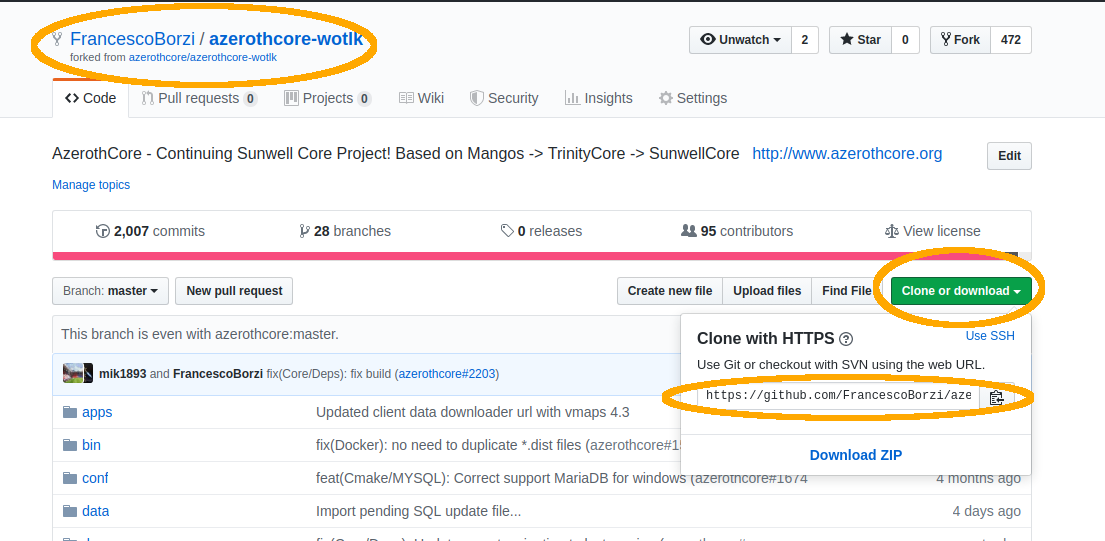 - -Now open the **terminal** (if you are on Windows, use the [git bash terminal](https://git-scm.com/downloads)) -and type `git clone ` followed by the git address of your fork that you just copied: - - - -``` -git clone https://github.com/YourUsername/azerothcore-wotlk.git -``` - -Wait until the download ends and then access the `azerothcore-wotlk` directory: - -``` -cd azerothcore-wotlk -``` - - - - -### 3. Create a new branch - -**IMPORTANT:** never commit changes your `master` branch, it will make your fork messy. - -When creating a new branch, git will create a copy of your **current** branch. -Always make sure you are on `master` branch **before** creating a new branch by typing: - -``` - git checkout master -``` - -Create a new branch giving it a name that is different than any existing branch. - -You can give any name you want (replace "xxx" with whatever you are fixing): - -``` -git checkout -b fix-issue-xxxx -``` - - - - -### 4. Add your C++ changes (if any) - -If you don't have any C++ changes, you can skip this. Otherwise, open your editor and do them now! I'll wait... - -In this guide we will assume that you modified the file `instance_deadmines.cpp` - -Now add your file(s) to be committed: - -``` -git add src/server/scripts/EasternKingdoms/Deadmines/instance_deadmines.cpp -``` - -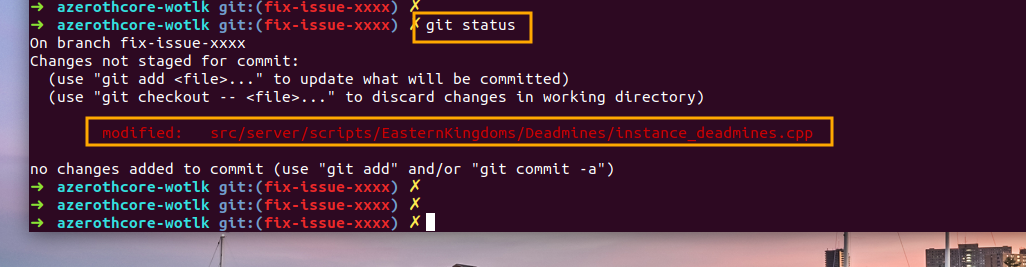 - -If you modified more files, just add them using `git add path/to/file` - -You can use the `git status` command to check which files have been selected to be committed: - - - - -### 5. Add your SQL changes (if any) - -If you don't have any SQL changes, you can skip this. Otherwise, run the following: - -``` -./data/sql/updates/pending_db_world/create_sql.sh -``` - -This will generate a new file located at `data/sql/updates/pending_db_world` -having a unique name that looks like `rev_XXXXXXXXXXXX.sql` - - - -Open it with a text editor. You will notice that it contains some SQL code like: - -``` -INSERT INTO `version_db_world` (`sql_rev`) VALUES ('XXXXXXXXXXXX'); -``` - -Do NOT remove this line. Add your SQL code below and save it. - -Now add this file to be committed using the `git add path/to/file` command: - -``` -git add data/sql/updates/pending_db_world/rev_XXXXXXXXXXXX.sql -``` - -(of course replace `rev_XXXXXXXXXXXX.sql` with the actual name of the file) - -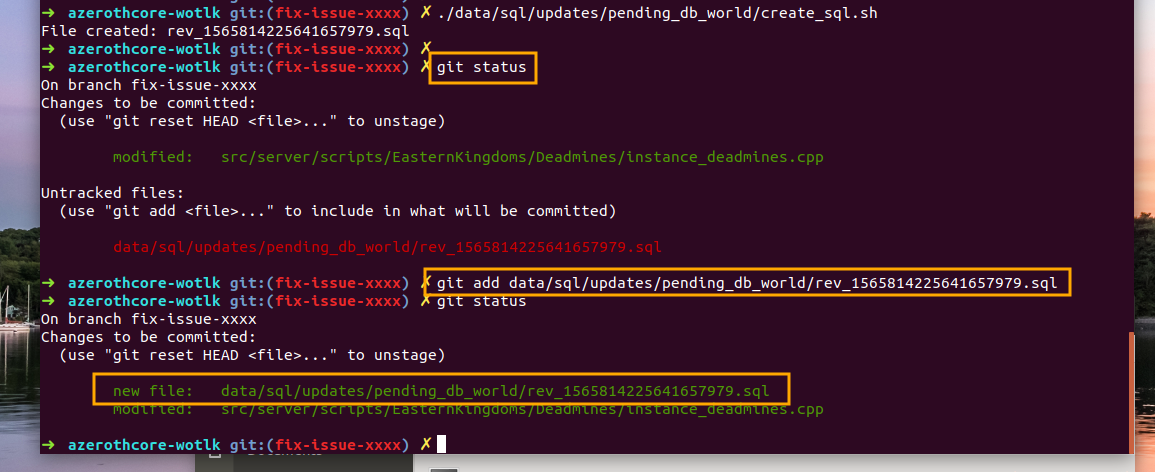 - -### 6. Commit & Push your changes - -First of all make sure to use the AC commit template (this should only be necessary once): -``` -git config --local commit.template ".git_commit_template.txt" -``` - -When you will write your commit message, it will use the default text editor `Vim` which is very hard to manipulate. You can keep it or you can instead use the much simpler `Nano` editor. Here is how to proceed, type: -``` -git config --global core.editor "nano" -``` - -Then commit your changes by typing: -``` -git commit -``` -You are then prompted to specify an appropriate commit message. Please, follow the format guidelines here (= every line starting by a # that will be ignored in the commit message), and you can refer to a commit like [this](https://github.com/azerothcore/mod-npc-beastmaster/commit/53cf90233091db2191b522f0fa7c4b6009dca22e) as an example. -If using `Nano`, press [ctrl]+[x] and say yes to save and exit (other commands are written at the bottom in `Nano`, and can be found easily on the net or by typing `man nano` in the terminal). - -Verify you're satisfied by typing `git show`. Exit by pressing [q]. If not satisfied, you can recommit the **last local** commit by typing `git commit --amend`. - -Now it's time to push them remotely. -If you use the `git push` command for the first time in this branch, -git will ask to specify which remote branch you want to push to. - -So you should give: - -``` -git push --set-upstream origin fix-issue-xxxx -``` - -(of course replace `fix-issue-xxxx` with the actual name of your branch) - -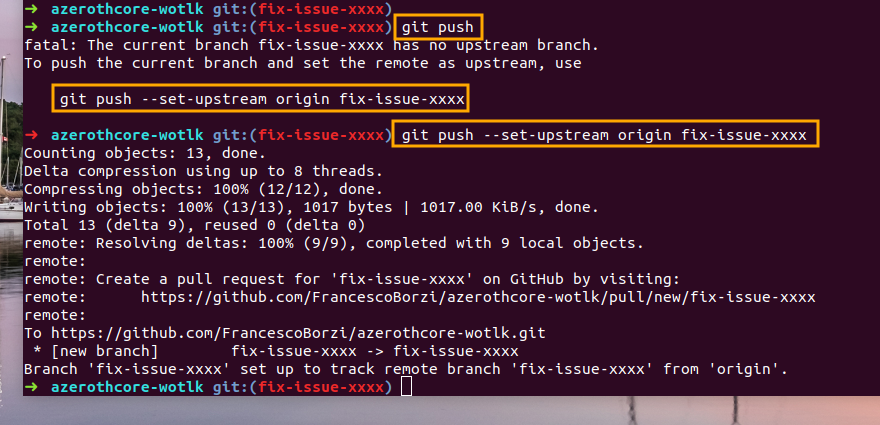 - - -### 7. Open the PR - -Go back to the [main AzerothCore repository](https://github.com/azerothcore/azerothcore-wotlk), -you will notice that GitHub is smart enough to realize that you are about to open a PR -and shows this nice light-yellow box: - -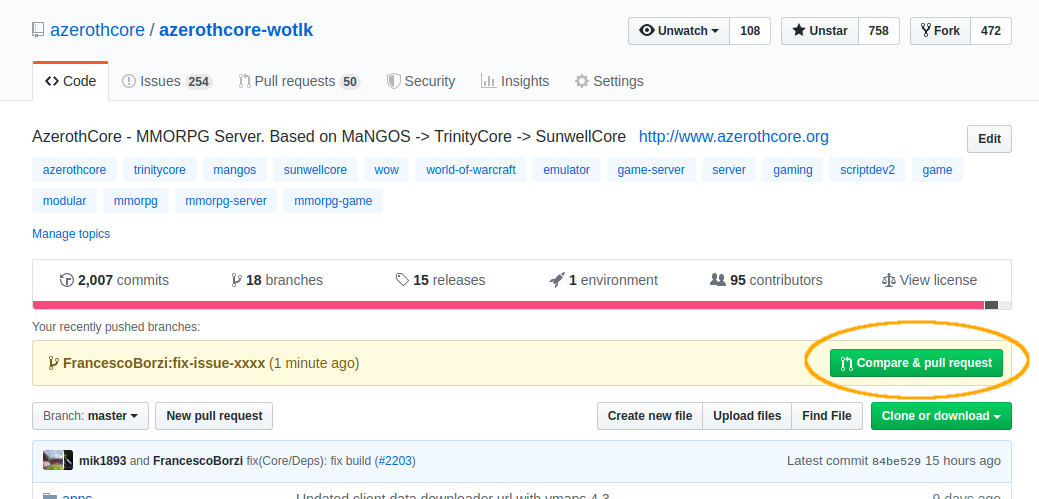 - -click on the "Compare & pull request" green button (located on the right). - -Now fill the PR template following the instructions that will appear in the screen, -do not forget to add the **testing instructions** so people can be able to test your PR and it can be merged: - -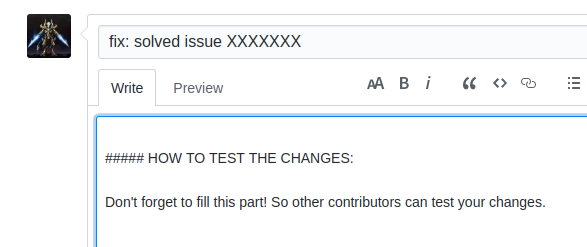 - -It's also a good practice to check the "File changes" tab to see that everything is in place as you expect: - - - -**NOTE:** We do not respond well to leechers! If your fix comes from another organization or person you should ALWAYS give credit to the original author and commit. - -That's it! - -## FAQ - -### There is something wrong or missing in the file changes, I want to push more changes - -Just edit/add the files that you want, `git add` them, then commit & push again. -If you refresh your PR's page you will see the changes. - -### I've already created a PR, what should I do to create another one? - -Just repeat the procedure starting from the step 3. - -Be careful when creating a new branch: you **must** be in branch `master` first (type `git checkout master`). - -### Wow can I update my fork's master branch? - -If you never updated your fork before, type: - -``` -git remote add upstream https://github.com/azerothcore/azerothcore-wotlk.git -``` - -Then follow these steps: - -1) `git checkout master` -2) `git fetch upstream` -3) `git merge upstream/master` -4) `git push origin master` - -Your fork is now updated. - -### How can I update my branch with latest master? - -You have to update your fork's master branch first (see above). - -Then just `git checkout your-branch` and `git merge master`. - -### How much time does it take for my PR to be reviewed, tested and merged? - -This is an open source project and people work in their free time, so we cannot estimate it. - -What we can recommend is: write **clear** instructions to test your PR, so it will be easy for anyone to test it. - -If your test instructions are not clear or missing at all, -only advanced users will be able to test your PR and it will take much more time. - -### What terminal was used in this tutorial? - -https://github.com/robbyrussell/oh-my-zsh - -But any linux/mac terminal is ok too. -If you are so unlucky to be on windows, use [git bash](https://git-scm.com/downloads). - -### Do I have to re-authenticated every time I use git push? - -You can clone your own fork using SSH instead of HTTPS and then follow [this guide](https://docs.github.com/en/free-pro-team@latest/github/authenticating-to-github/adding-a-new-ssh-key-to-your-github-account) to set the SSH keys. - -This way you can use `git push` without typing your password over and over. |